What-is-a-Hypervisor-and-Its-Types-1

What is a Hypervisor?

Hypervisor

The hypervisor manages the virtualization technique and creates, runs, and monitors multiple virtual machines (guest) simultaneously, on single computer hardware (host).

So, hypervisors regulate the virtualization process, creates multiple virtual machines that allow you to work on several computing instances at once. This is the key difference between Virtualization and Hypervisors.

The Virtual Machine Monitor or VMM or a Hypervisor acts as a supervisor. It’s implemented on computer hardware as code embedded in a system’s firmware or as a software layer.

Hypervisors create, start, stop, and reset multiple VMs while virtually sharing its resources like RAM and Network interface controller.

VMM governs the guest operating systems and manages execution on a virtual operating platform. It furthermore separates Virtual Machines (VMs) from each other logically, so even if one OS crashes for some reason, the other VMs can function unhindered.

A hypervisor is a form of virtualization software used in Cloud hosting to divide and allocate the resources on various pieces of hardware. The program which provides partitioning, isolation, or abstraction is called a virtualization hypervisor. The hypervisor is a hardware virtualization technique that allows multiple guest operating systems (OS) to run on a single host system at the same time. A hypervisor is sometimes also called a virtual machine manager(VMM).


Types of Hypervisor

Type 1 and Type 2

Based on their working system Hypervisors are divided into two categories-

  • Type 1 – Bare Metal hypervisor
  • Type 2 – Hosted hypervisor

The primary contributor to why hypervisors are segregated into two types is because of the presence or absence of the underlying operating system.

Type 1 runs directly on the hardware with Virtual Machine resources provided. Type 2 runs on the host OS to provide virtualization management and other services.

Hypervisor Type 1 vs. Type 2 in Tabular Form
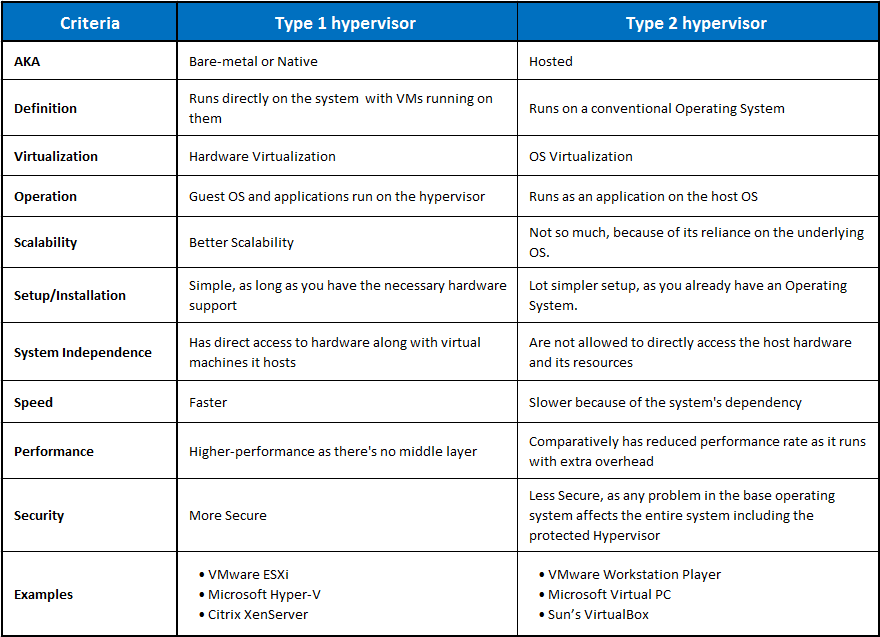
type 1 hypervisor vs type 2 hypervisor Bare-metal Native vs Hosted tabular form - Difference

Hosted Hypervisor v/s Native :  Which is the better option ?

For enterprise applications and cloud computing, the Bare-metal hypervisors are preferable, primarily because of its independence from the host operating system.

For the same reason, type 1 generates lesser overhead, and any malfunction in an individual VM does not harm the rest of the system.

The native hypervisors are a more secure option. Unlike the hosted hypervisor, they do not depend upon the underlying OS.

So if under attack, you have better chances with the bare-metal hypervisor (Type 1).  This dependency also costs the type 2 server, a little bit of its efficiency, performance, and speed.

Type 2 does not have direct access to the host hardware and resources, so this may make a certain degree of latency inevitable. The already present OS manages the requirements for memory, storage, and network resources.

Although this is not the case for more straightforward scenarios, Hosted Hypervisors are still popular for personal use and SMBs.

For some developer environments, like where access to multiple OSs and their variants is required, Type 2 hypervisors are a better option. On devices not dedicated to the VMs Host role, hosted hypervisors are recommended.

ubuntu server installation

Install Ubuntu Server

1. Overview

Ubuntu Server is a variant of the standard Ubuntu you already know, tailored for networks and services.

Unlike the installation of Ubuntu Desktop, Ubuntu Server does not include a graphical installation program. Instead, it uses a text menu-based process. If you’d rather install the desktop version, take a look at our Install Ubuntu desktop tutorial.

This guide will provide an overview of the installation from a USB flash drive.

2. Requirements

You’ll need to consider the following before starting the installation:

  • Ensure you have at least 2GB of free storage space.
  • Have access to a USB flash drive containing the version of Ubuntu Server you want to install.
  • If you’re going to install Ubuntu Server alongside data you wish to keep, ensure you have a recent backup.

Checkout This tutorial that explain how to create an Ubuntu USB flash drive.

3. Boot from install media

To trigger the installation process, perform the following:

  1. Insert the USB stick or other install media.
  2. Restart your computer.
  3. Go to BIOS and Disable Secure Boot and Enable UEFI
  4. Boot From Usb Drive

After a few moments, you should see messages like those shown below on the screen…


If you are still having problems, check out the Ubuntu Community documentation on booting from CD/DVD/USB.

4. Choose your language

After the boot messages appear, a ‘Language’ menu will be displayed.

As the message suggests, use the UpDown and Enter keys to navigate through the menu and select the language you wish to use.

5. Choose the correct keyboard layout

Before you need to type anything in, the installer will next display a menu asking you to select your keyboard layout and, if applicable, the variant.

If you don’t know which particular variant you want, just go with the default – when Ubuntu Server has been installed you can test and change your preferences more easily if necessary.


6. Choose your install

Now we are ready to select what you want to install. There are three options in the menu:

The bottom two options are used for installing specific components of a Metal As A Service (MAAS) install. If you are installing MAAS, you should check out the MAAS documentation for more information on this! The rest of this tutorial assumes you select the first option, Install Ubuntu.

7. Networking

The installer will automatically detect and try to configure any network connections via DHCP.

This is usually automatic and you will not have to enter anything on this screen, it is for information only.

8. Configure storage

The next step is to configure storage. The recommended install is to have an entire disk or partition set aside for running Ubuntu.

If you need to set up a more complicated system, the manual option will allow you to select and reorganise partitions on any connected drives.

9. Select a device

This menu will allow you to select a disk from the ones detected on the system.

To help identification, the drives will be listed using their system ID. Use the arrow keys and enter to select the disk you wish to use.

10. Confirm partitions

With the target drive selected, the installer will calculate what partitions to create and present this information…

If this isn’t what you expected to see (e.g., you have selected the wrong drive), you should use the arrow keys and enter to select Back from the options at the bottom of the screen. This will take you back to the previous menu where you can select a different drive.

It is also possible to manually change the partitions here, by selecting Edit Partitions. Obviously you should only select this if you are familiar with how partitions work.

When you are happy with the disk layout displayed, select Done to continue.

11. Confirm changes

Before the installer makes any destructive changes, it will show this final confirmation step. Double check that everything looks good here and you aren’t about to reformat the wrong device!

12. Set up a Profile

The software is now being installed on the disk, but there is some more information the installer needs. Ubuntu Server needs to have at least one known user for the system, and a hostname. The user also needs a password.

13. Install software

Once you have finished entering the required information, the screen will now show the progress of the installer. Ubuntu Server now installs a concise set of useful software required for servers. This cuts down on the install and setup time dramatically. Of course, after the install is finished, you can install any additional software you may need.

14. Installation complete

When the install is complete, you will see a message like this on the screen.

Remember to remove the install media, and then press enter to reboot and start the server. Welcome to Ubuntu!

Congratulations You Have Successfully installed Ubuntu Server