What-is-a-Hypervisor-and-Its-Types-1

What is a Hypervisor?

Hypervisor

The hypervisor manages the virtualization technique and creates, runs, and monitors multiple virtual machines (guest) simultaneously, on single computer hardware (host).

So, hypervisors regulate the virtualization process, creates multiple virtual machines that allow you to work on several computing instances at once. This is the key difference between Virtualization and Hypervisors.

The Virtual Machine Monitor or VMM or a Hypervisor acts as a supervisor. It’s implemented on computer hardware as code embedded in a system’s firmware or as a software layer.

Hypervisors create, start, stop, and reset multiple VMs while virtually sharing its resources like RAM and Network interface controller.

VMM governs the guest operating systems and manages execution on a virtual operating platform. It furthermore separates Virtual Machines (VMs) from each other logically, so even if one OS crashes for some reason, the other VMs can function unhindered.

A hypervisor is a form of virtualization software used in Cloud hosting to divide and allocate the resources on various pieces of hardware. The program which provides partitioning, isolation, or abstraction is called a virtualization hypervisor. The hypervisor is a hardware virtualization technique that allows multiple guest operating systems (OS) to run on a single host system at the same time. A hypervisor is sometimes also called a virtual machine manager(VMM).


Types of Hypervisor

Type 1 and Type 2

Based on their working system Hypervisors are divided into two categories-

  • Type 1 – Bare Metal hypervisor
  • Type 2 – Hosted hypervisor

The primary contributor to why hypervisors are segregated into two types is because of the presence or absence of the underlying operating system.

Type 1 runs directly on the hardware with Virtual Machine resources provided. Type 2 runs on the host OS to provide virtualization management and other services.

Hypervisor Type 1 vs. Type 2 in Tabular Form
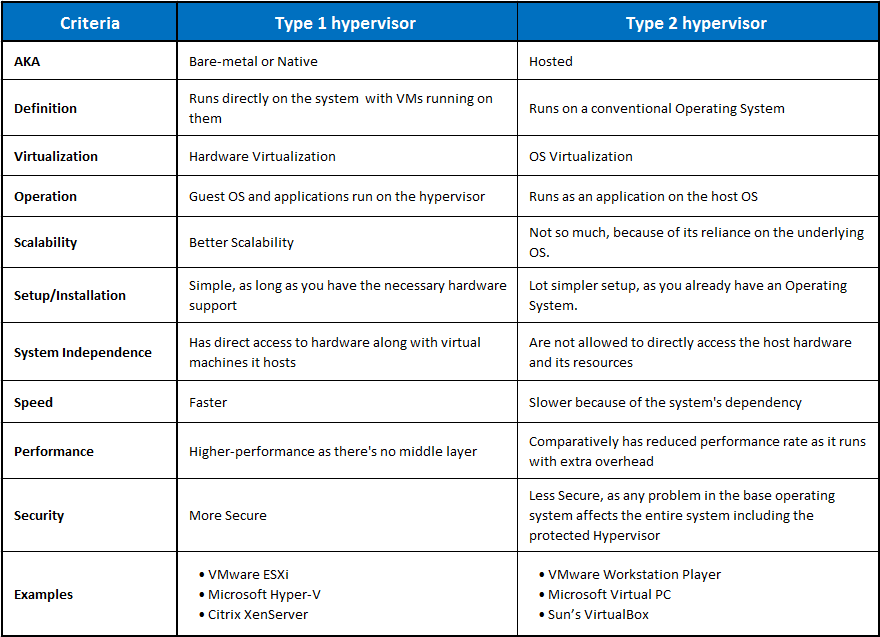
type 1 hypervisor vs type 2 hypervisor Bare-metal Native vs Hosted tabular form - Difference

Hosted Hypervisor v/s Native :  Which is the better option ?

For enterprise applications and cloud computing, the Bare-metal hypervisors are preferable, primarily because of its independence from the host operating system.

For the same reason, type 1 generates lesser overhead, and any malfunction in an individual VM does not harm the rest of the system.

The native hypervisors are a more secure option. Unlike the hosted hypervisor, they do not depend upon the underlying OS.

So if under attack, you have better chances with the bare-metal hypervisor (Type 1).  This dependency also costs the type 2 server, a little bit of its efficiency, performance, and speed.

Type 2 does not have direct access to the host hardware and resources, so this may make a certain degree of latency inevitable. The already present OS manages the requirements for memory, storage, and network resources.

Although this is not the case for more straightforward scenarios, Hosted Hypervisors are still popular for personal use and SMBs.

For some developer environments, like where access to multiple OSs and their variants is required, Type 2 hypervisors are a better option. On devices not dedicated to the VMs Host role, hosted hypervisors are recommended.

casaos

CasaOS Installation

Getting Started

You Can install CasaOs on a ZimaBoard, Intel NUC, and Raspberry Pi. Also, more computers and development boards and fully compatible with Ubuntu, Debian, Raspberry Pi OS, and CentOS with one-liner installation.


Demo CasaOS

Username:casaos
Password:casaos


CasaOS Snapshot

Hardware Compatibility

  • amd64 / x86-64
  • arm64
  • armv7

System Compatibility

Official Support

  • Debian 12 (✅ Tested, Recommended)
  • Ubuntu Server 20.04 (✅ Tested)
  • Raspberry Pi OS (✅ Tested)

Quick Setup CasaOS or Install CasaOS

Freshly install a system from the list above and run this command:

wget -qO- https://get.casaos.io | sudo bash

or

curl -fsSL https://get.casaos.io | sudo bash

Uninstall CasaOS

v0.3.3 or newer

casaos-uninstall

Before v0.3.3

curl -fsSL https://get.icewhale.io/casaos-uninstall.sh | sudo bash
ubuntu server installation

Install Ubuntu Server

1. Overview

Ubuntu Server is a variant of the standard Ubuntu you already know, tailored for networks and services.

Unlike the installation of Ubuntu Desktop, Ubuntu Server does not include a graphical installation program. Instead, it uses a text menu-based process. If you’d rather install the desktop version, take a look at our Install Ubuntu desktop tutorial.

This guide will provide an overview of the installation from a USB flash drive.

2. Requirements

You’ll need to consider the following before starting the installation:

  • Ensure you have at least 2GB of free storage space.
  • Have access to a USB flash drive containing the version of Ubuntu Server you want to install.
  • If you’re going to install Ubuntu Server alongside data you wish to keep, ensure you have a recent backup.

Checkout This tutorial that explain how to create an Ubuntu USB flash drive.

3. Boot from install media

To trigger the installation process, perform the following:

  1. Insert the USB stick or other install media.
  2. Restart your computer.
  3. Go to BIOS and Disable Secure Boot and Enable UEFI
  4. Boot From Usb Drive

After a few moments, you should see messages like those shown below on the screen…


If you are still having problems, check out the Ubuntu Community documentation on booting from CD/DVD/USB.

4. Choose your language

After the boot messages appear, a ‘Language’ menu will be displayed.
As the message suggests, use the UpDown and Enter keys to navigate through the menu and select the language you wish to use.

5. Choose the correct keyboard layout

Before you need to type anything in, the installer will next display a menu asking you to select your keyboard layout and, if applicable, the variant.

If you don’t know which particular variant you want, just go with the default – when Ubuntu Server has been installed you can test and change your preferences more easily if necessary.


6. Choose your install

Now we are ready to select what you want to install. There are three options in the menu:

The bottom two options are used for installing specific components of a Metal As A Service (MAAS) install. If you are installing MAAS, you should check out the MAAS documentation for more information on this! The rest of this tutorial assumes you select the first option, Install Ubuntu.

7. Networking

The installer will automatically detect and try to configure any network connections via DHCP.

This is usually automatic and you will not have to enter anything on this screen, it is for information only.

8. Configure storage

The next step is to configure storage. The recommended install is to have an entire disk or partition set aside for running Ubuntu.

If you need to set up a more complicated system, the manual option will allow you to select and reorganise partitions on any connected drives.

9. Select a device

This menu will allow you to select a disk from the ones detected on the system.

To help identification, the drives will be listed using their system ID. Use the arrow keys and enter to select the disk you wish to use.

10. Confirm partitions

With the target drive selected, the installer will calculate what partitions to create and present this information…

If this isn’t what you expected to see (e.g., you have selected the wrong drive), you should use the arrow keys and enter to select Back from the options at the bottom of the screen. This will take you back to the previous menu where you can select a different drive.

It is also possible to manually change the partitions here, by selecting Edit Partitions. Obviously you should only select this if you are familiar with how partitions work.

When you are happy with the disk layout displayed, select Done to continue.

11. Confirm changes

Before the installer makes any destructive changes, it will show this final confirmation step. Double check that everything looks good here and you aren’t about to reformat the wrong device!

12. Set up a Profile

The software is now being installed on the disk, but there is some more information the installer needs. Ubuntu Server needs to have at least one known user for the system, and a hostname. The user also needs a password.
13. Install software

Once you have finished entering the required information, the screen will now show the progress of the installer. Ubuntu Server now installs a concise set of useful software required for servers. This cuts down on the install and setup time dramatically. Of course, after the install is finished, you can install any additional software you may need.

14. Installation complete

When the install is complete, you will see a message like this on the screen.

Remember to remove the install media, and then press enter to reboot and start the server. Welcome to Ubuntu!

Congratulations You Have Successfully installed Ubuntu Server

pihole installation guide

PiHole Installation

Pi-Hole requirements

Pi-Hole is a lightweight solution, and that doesn’t require much processing power to install it. In fact, it’s mainly used on the Raspberry Pi, a tiny computer with limited CPU and RAM, so it shouldn’t be an issue on any standard computer.

In their documentationPi-Hole recommends at least 2 GB of free space on the disk and 512 MB RAM.

Your computer will be perfect, but you can also use a Raspberry Pi 4 or a minimal Intel NUC for example. You can also install it on a Synology NAS, with a docker container.

Note: If you are trying this on a Raspberry Pi with the default operating system, I have a detailed tutorial on how to install Pi-Hole on Raspberry Pi. In this article, I’ll focus on Ubuntu.

Update your operating system

Once your hardware is selected and Ubuntu is installed, the first thing to do is to update your system. It’s a good practice to follow before installing anything on your system, just to avoid dependency issues and version incompatibility.

You can do this easily in a terminal:
sudo apt update
sudo apt upgrade

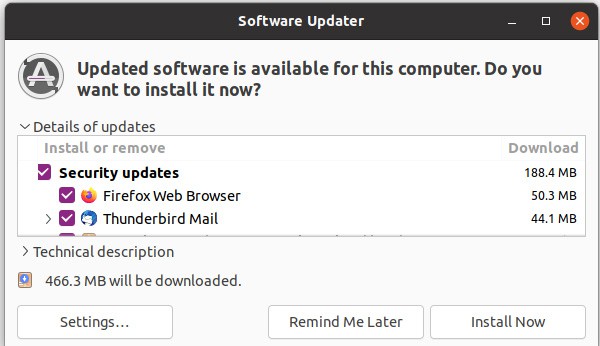
Or use the software updater tool in the graphic interface if you are using the Desktop version:

Click on “Install now” and type the user password to confirm the installation.
A reboot is probably a good idea if you have many updates to catch up on.

Then you’ll also need to install curl on your system if not already there:
sudo apt install curl

The Pi-Hole script will install anything else after that.

Pi-Hole installation script

Once your system is ready, the installation can be done with only one command, by copying and pasting this into a terminal:
curl -sSL https://install.pi-hole.net | bash

The process is almost automatic, but you still need to answer a few questions to adjust your settings:

  • Type your user password, and the installation starts:
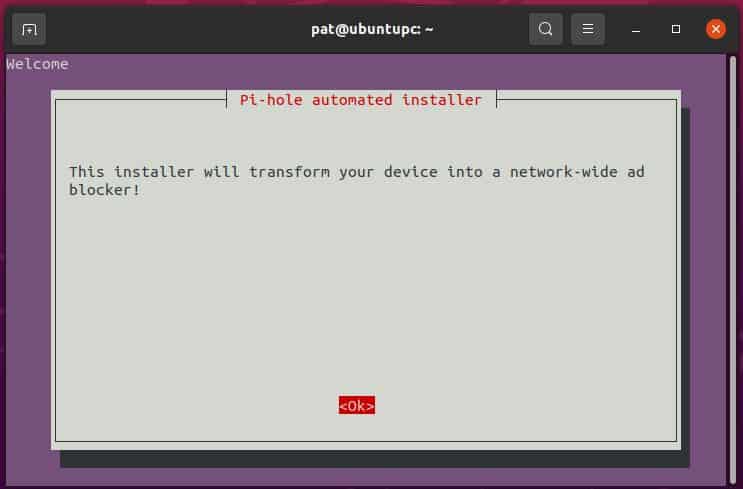
  • A few seconds later, a wizard will show up with a few questions for you to answer:

    Just confirm by pressing Enter for the first few questions.
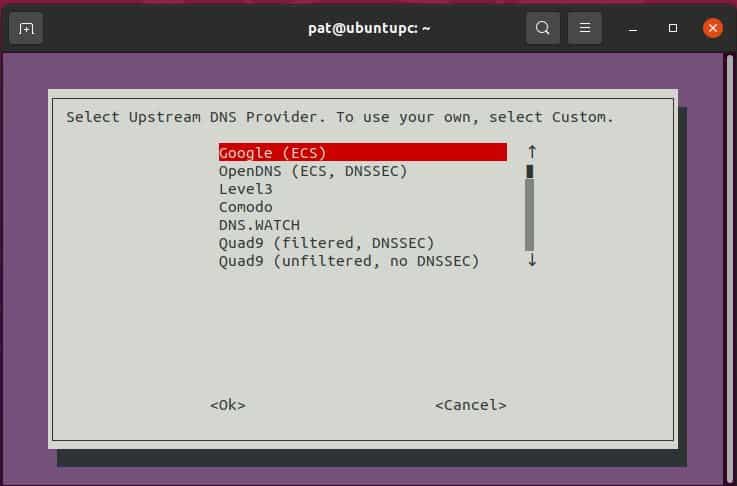
  • Then choose your DNS provider:

    Google is fine, but you can choose another one if you prefer.
  • Pi-hole relies on third-party lists to block ads. By default, it will use StevenBlack’s host list, but you can deselect it if you want (not recommended).
    Press Enter to continue (and the space bar to select/deselect).
  • Then, select the protocols you want to use (I recommend keeping both).
  • Pi-Hole will use a static IP address (to avoid reconfiguring everything each time it uses a new IP).
    The next step is to configure if you want to keep the current IP or set another one manually.
    It depends on your network, at home you can probably keep the default one without any major issues.
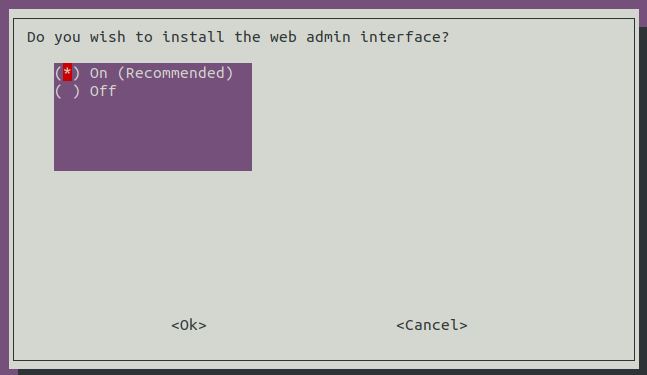
  • Then confirm to enable the web interface and the web server (highly recommended):
  • A couple of questions later, the installation wizard will configure everything as requested.

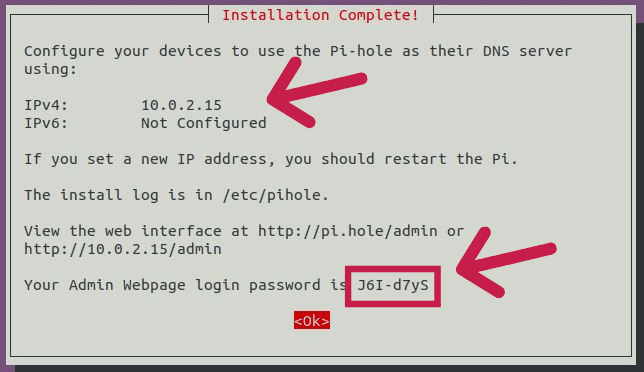
Make sure to not use the default password and move to the next step.

Configure your clients to use Pi-Hole

Once your server is installed, the next step is to configure your network to use this server. Pi-Hole works like a DNS server, so you need to change the primary DNS server on all of the devices to use the Pi-Hole IP address.

This can be done manually on each device, but the easiest way is to change the default DNS server in your DHCP configuration.

Edit the DHCP configuration to set Pi-Hole as the default DNS

The easiest way to config all devices at once is to go to your DHCP server configuration and set the primary DNS server to the Pi-Hole server IP address.

If you are installing this at home, your DHCP server is probably your Internet router.
I won’t explain how to do this in detail, as it will be different for each provider and router, but as a whole, the idea is to find the DHCP settings on the web interface and change the DNS server IP address.

By default, it’s probably the DNS server from your provider.
In my case, it was in the DNS settings:

Once you find something like this, remove the default values and set the primary DNS server to your Pi-Hole installation IP address (probably something like 192.168.1.X or 192.168.0.X). Leave the secondary DNS server empty.

It may take a few hours to update the configuration on all devices on your network, but it will be done automatically.

Change the network configuration on each client to use Pi-Hole

The alternative is to manually update the configuration on each device you want to use with Pi-Hole. This might take more time, especially if you have many devices on your network, but this way you can make sure everything is working before breaking the Internet for the whole family!

On Windows 10:

  • Right-click on the “Start Menu” and choose “Network Connections”.
  • Then click on “Change adapter settings”.
  • Right-click on your current connection and choose “Properties”.
  • Double-click on “Internet Protocol Version 4 (TCP/IPv4)”.
  • Set the DNS server to static and enter your Pi-Hole server IP Address.
    Keep the secondary DNS server empty.

On Linux and Mac OS:

  • If you have a graphical interface, you’ll find the network settings in the System Preferences.
  • If not, you can edit the /etc/resolv.conf file and replace the current DNS server with the Pi-Hole IP address.

On mobile, it’s in your Wi-Fi settings.
Click details or edit the network on a network to see the DNS configuration.

How to know if Pi-Hole is working?

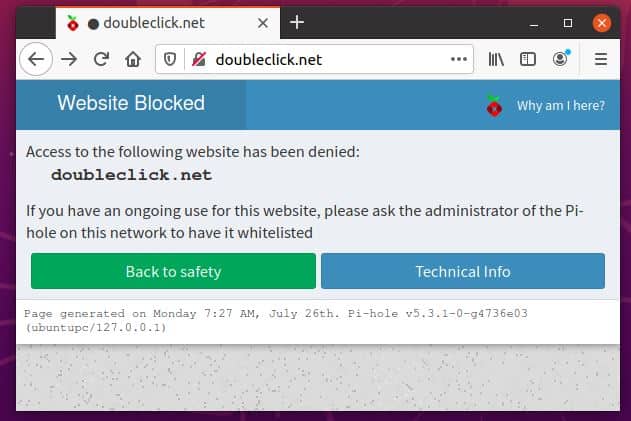
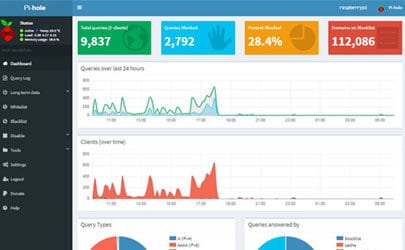
To know if Pi-Hole is working, you can go to the web interface and check if it’s blocking ads. Another way is to try to access a domain hosting ad (like doubleclick.net) and verify that the Pi-Hole page appears instead of the website content.

The web interface is enabled on http://localhost/admin (if installed on your computer) or http://IP_Address/admin (if installed on another computer). The default password is provided at the end of the installation.

Pi-Hole installation guide on Raspberry Pi
proxmox installation guide

How to Install Proxmox VE

Introduction

Proxmox VE is an open-source server platform for enterprise virtualization. As a Debian-based Linux distribution, Proxmox uses a modified Ubuntu kernel to run multiple virtual machines and containers on a single server. You can deploy and manage virtualized environments through a web console or a command line, ensuring simple and fast accessibility.

Prerequisites

  • A physical or dedicated server.
  • 64bit CPU.
  • At least 1GB of RAM (and additional RAM needed for guests).
  • A USB stick with at least 1GB.

Install Proxmox Virtual Environment

Follow the steps below to install Proxmox VE on a physical or dedicated server.

Step 1: Download Proxmox ISO Image

The first step is to download the Proxmox VE ISO image.

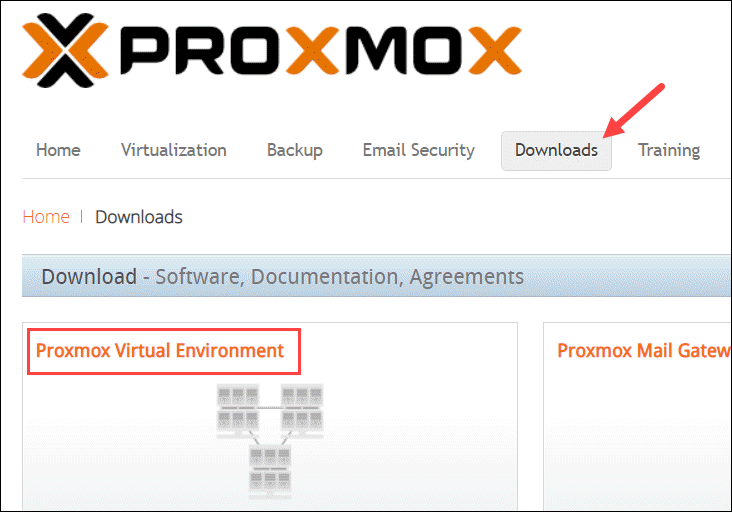
1. Navigate to the official Proxmox Downloads page and select Proxmox Virtual Environment.

Proxmox download page.

2. This takes you to the Proxmox Virtual Environment Archive, which stores ISO images and official documentation. Select ISO Images to continue.

Open Proxmox ISO images achieve.

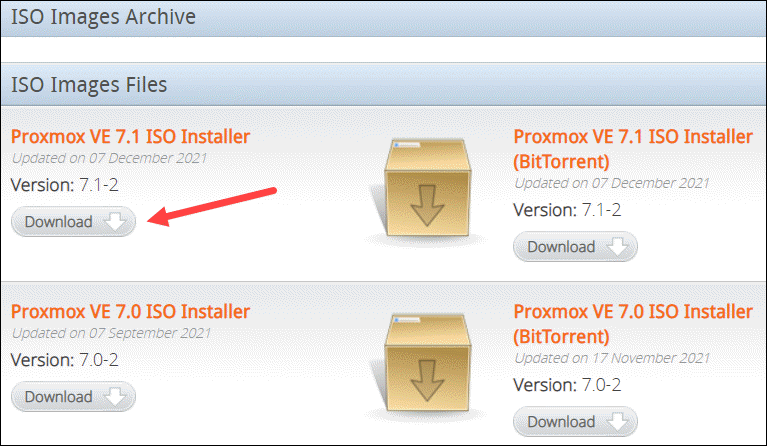
3. At the time of writing, the latest version of the Proxmox VE ISO Installer is 7.1. If a newer version is available, it is listed at the top. Click Download and save the file.

Download the latest Proxmox VE ISO installer.

Step 2: Prepare Installation Medium

Copy the Proxmox ISO image on a CD/DVD or a USB flash drive. Although both options are possible, it is assumed that most systems won’t have an optical drive.

Plug in the USB drive and copy the ISO image to the USB stick using the command line or a USB formatting utility (such as Etcher or Rufus).

Step 3: Launch the Proxmox Installer

1. Move to the server (machine) where you want to install Proxmox and plug in the USB device.

2. While the server is booting up, access the boot menu by pressing the required keyboard key(s). Most commonly, they are either EscF2F10F11, or F12.

3. Select the installation medium with the Proxmox ISO image and boot from it.

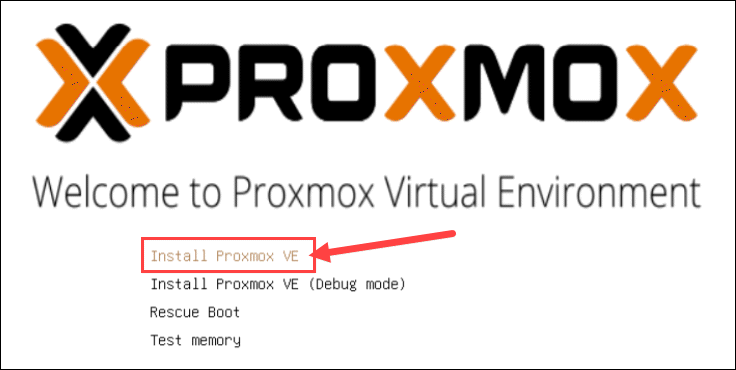
4. Next, the Proxmox VE menu appears. Select Install Proxmox VE to start the standard installation.

Proxmox installer menu.

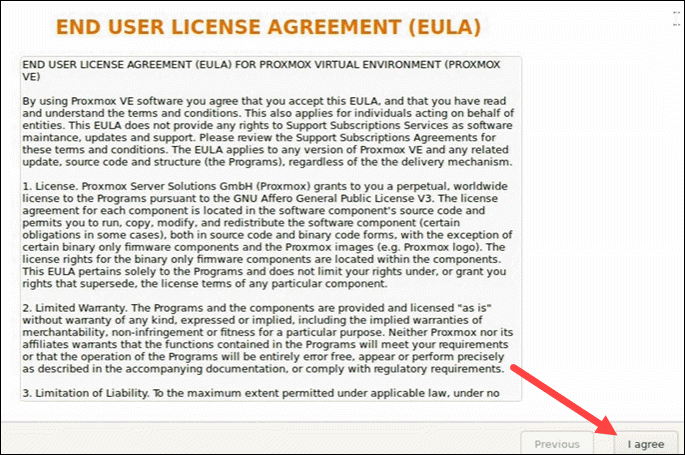
5. Read and accept the EULA to continue.

Proxmox EULA.

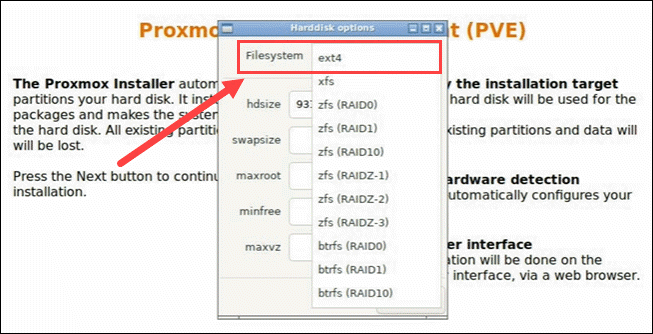
6. Choose the target hard disk where you want to install Proxmox. Click Options to specify additional parameters, such as the filesystem. By default, it is set to ext4.

Select Proxmox target hard disk.

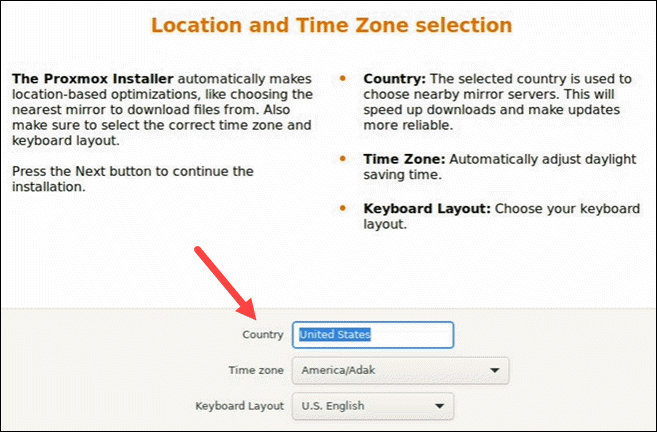
7. Then, set the location, time zone, and keyboard layout. The installer autodetects most of these configurations.

Configure location and timezone for Proxmox.

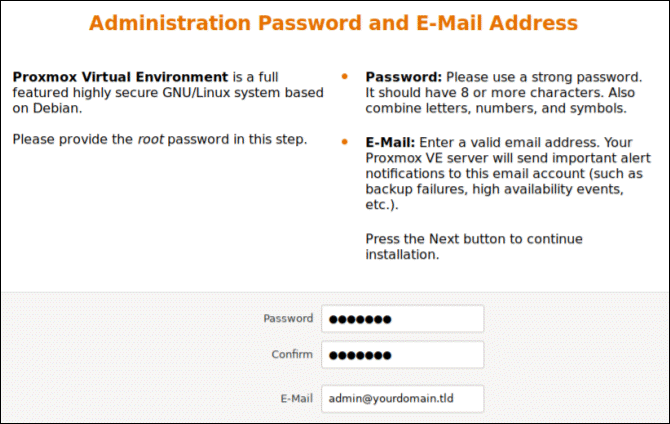
8. Create a strong password for your admin credentials, retype the password to confirm, and type in an email address for system administrator notifications.

Set administration password for Proxmox.

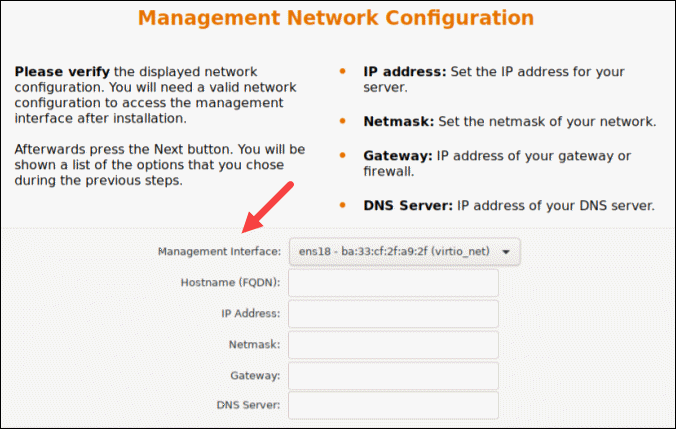
9. The final step in installing Proxmox is setting up the network configuration. Select the management interface, a hostname for the server, an available IP address, the default gateway, and a DNS server. During the installation process, use either an IPv4 or IPv6 address. To use both, modify the configuration after installing.

Management network configuration.

10. The installer summarizes the selected options. After confirming everything is in order, press Install.

11. remove the USB drive and reboot the system after installation.

Step 4: Run Proxmox

1. Once the system reboots, the Proxmox GRUB menu loads. Select Proxmox Virtual Environment GNU/Linux and press Enter.

2. Next, the Proxmox VE welcome message appears. It includes an IP address that loads Proxmox. Navigate to that IP address in a web browser of your choice.

Proxmox welcome output.

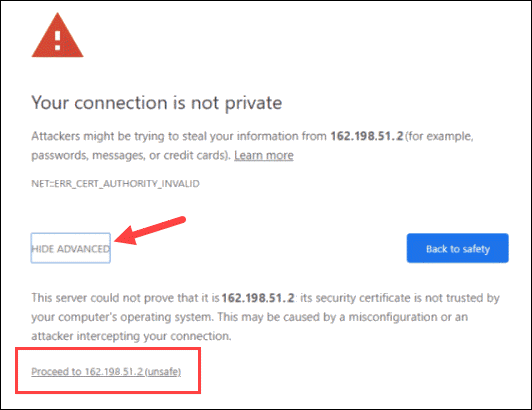
3. After navigating to the required IP address, you may see a warning message that the page is unsafe because Proxmox VE uses self-signed SSL certificates. Click the IP link to proceed to the Proxmox web management interface.

Accept proxmox certificate and proceed.

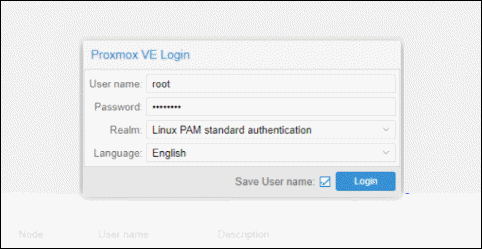
4. To access the interface, log in as root and provide the password set when installing Proxmox.

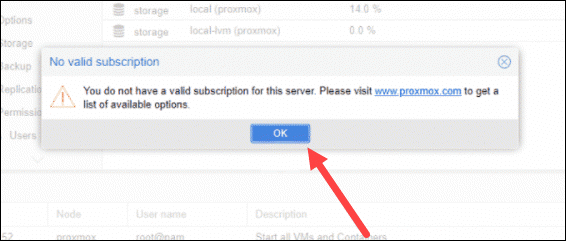
5. A dialogue box pops up saying there is no valid subscription for the server. Proxmox offers an optional add-on service to which you can subscribe. To ignore the message, click OK.

Step 5: Create a VM

Now that you logged in to the Proxmox web console, follow these steps to create a virtual machine.

1. Before going through the steps to create a virtual machine, make sure you have ISO images for installation mediums. Move to the resource tree on the left side of your GUI.

Select the server you are running and click on local (pve1). Select ISO Images from the menu and choose between uploading an image or downloading it from a URL.

Add ISO images to Proxmox VE.

2. Once you have added an ISO image, spin up a virtual machine. Click the Create VM button.

Start creating a VM on Proxmox.

3. Provide general information about the VM:

  • Start by selecting the Node. If you are starting and have no nodes yet, Proxmox automatically selects node 1 (pve1).
  • Provide a VM ID. Each resource has to have a unique ID.
  • Finally, create a name for the VM. Use an easily identifiable name.
General options for setting up a virtual machine.

3. Next, switch to the OS tab and select the ISO image you want for your VM. Define the Type of the OS and kernel Version. Click Next to continue.

Select OS for Proxmox virtual machine.

4. Modify system options (such as the Graphic card and SCSI controller) or leave the default settings.

System options for proxmox.

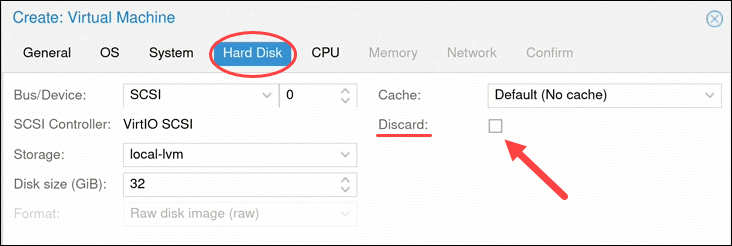
5. Configure any Hard Disk options you want the VM to have. You can leave all the default settings. However, if the physical server uses an SSD, enable the Discard option.

Hard disk options for Proxmox VM.

6. The number of Cores the physical server has determines how many cores you can provide to the VM. The number of cores allocated also depends on the predicted workload.

Set CPU options for Proxmox virtual machine.

7. Next, choose how much Memory (MiB) you want to assign to the VM.

Configure memory for virtual machine.

8. Move on to the Network tab. It is recommended to separate the management interface and the VM network. For now, leave the default setting.

Configure network options for VM.

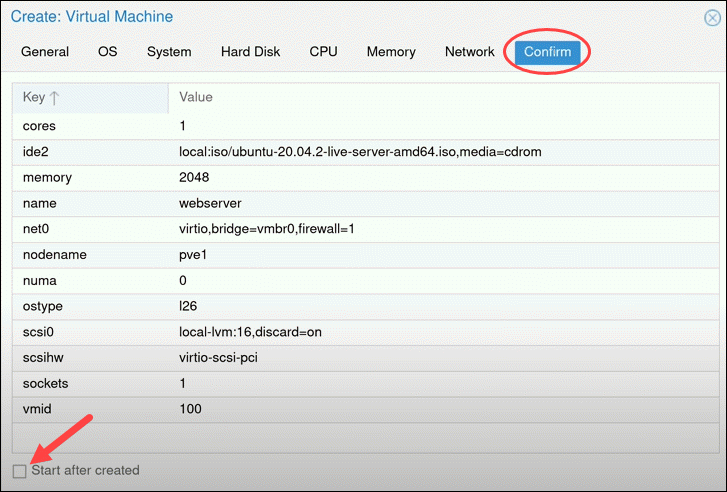
9. After clicking Next, Proxmox loads the Confirm tab that summarizes the selected VM options. To start the VM immediately, check the box under the listed information or start the VM manually later. Click Finish to create the VM.

VM summary.

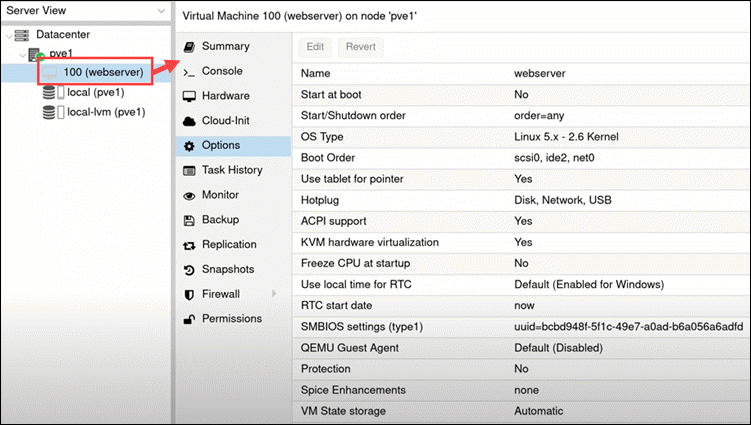
10. See the newly created VM in the resource tree on the left side of the screen. Click on the VM to see its specifications and options.

Proxmox virtual machine.

Congratulations You Have Successfully installed Proxmox VE